Overview

The File Upload question allows applicants to upload a single file for each upload field on an opportunity's form.

Administrators can configure the question's label, instructions, whether a response is required, accepted file categories, conditional logic, and layout.

The Accepted File Categories setting allows administrators to choose predefined file categories or specify custom file extensions to help applicants identify the appropriate files to upload.

Important: Accepted File Categories filters the files displayed in the applicant's file selection window. It does not prevent applicants from uploading a different file type.
For detailed instructions, see File Upload Option: Specifying File Extensions
Default Admin View

Settings Panel Sections
General
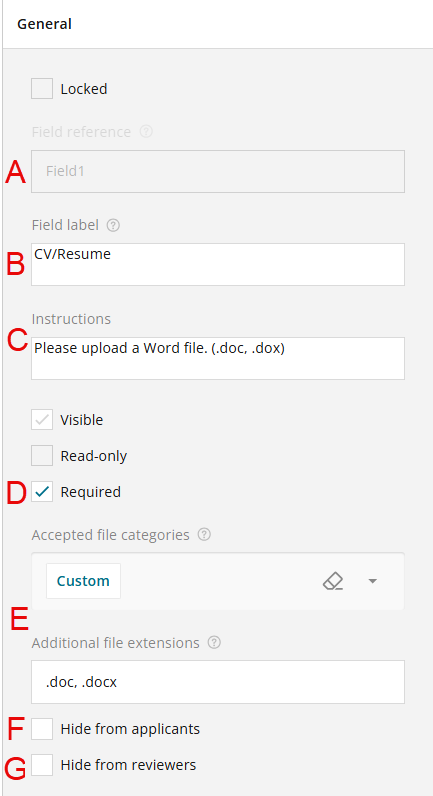
The General section contains the primary settings for the File Upload question.
A. Field reference – A unique identifier in the InfoReady database. This identifier is not displayed to applicants or reviewers.
B. Field label – The label displayed for the File Upload question.
C. Instructions (optional) – Additional information to help applicants understand what file to upload. You can include file requirements, naming conventions, or other instructions specific to the opportunity.
D. Required – Determines whether the applicant must upload a file to submit the application. You can also toggle this setting by clicking the asterisk (*) on the main form design screen.
E. Accepted File Categories – Determines which file types are displayed when applicants select a file from their computer. Available options include:
Images: Displays supported image file types, such as JPG, JPEG, and PNG.
Documents: Displays supported document file types, such as PDF, DOC, DOCX, XLS, XLSX, PPT, PPTX, TXT, and RTF.
Custom: Allows you to specify file extensions in the Additional File Extensions field. Enter each extension with a leading period (.) and separate multiple extensions with commas. For example:
.pdf, .docx, .xlsx.
Important: This setting filters the files displayed in the file selection window. It does not enforce file-type restrictions. Applicants may still be able to upload a file with a different extension.
For additional details, see File Upload Option: Specifying File Extensions.
F. Hide from reviewers (optional) – Select this option to hide the File Upload question and the applicant's response from reviewers.
G. Hide from applicants (optional) – Select this option to hide the File Upload question from applicants.
Logic
Use the Logic section to configure when the File Upload question is displayed and/or when it is required, based on responses to other questions.
- Full instructions here: Adding Conditional Logic

Layout
The Layout section controls how the File Upload question appears on the form.
H. Show on page – Select the page where the question should appear. You can also drag and drop the question on the main form design screen.
I. Display field on a new line – Determines whether the question appears on its own line.
J. Field label location – Determines whether and where the field label appears.
K. Instruction's location – Determines where the instructions appear in relation to the field label and upload field.

Example Customized Applicant View
Use the Preview tab to see how the File Upload question will appear to applicants.
Click directly in the label or instructions fields to edit the displayed text.
Switch back to the Designer tab to modify the question's settings, logic, or layout.
When applicants click Choose file, the file selection window filters the displayed files according to the configured Accepted File Categories or custom extensions.
The appearance of the file selection window may vary depending on the applicant's web browser and computer settings.
Remember that the accepted file categories filter the displayed files but do not prevent applicants from uploading other file types.

For comparison, check out these other question types:
- Text Area
- Rich Text Field
Have more questions about this topic? Go to the Community Forum to pose the question to other users or submit a support ticket to InfoReady.